
Using the Input Wizard to Create Inputs for the Custom Distribution Function: FScustominv()
Find the Finpak tool bar and click on the Input Distribution button (circled)
The following input box will appear:

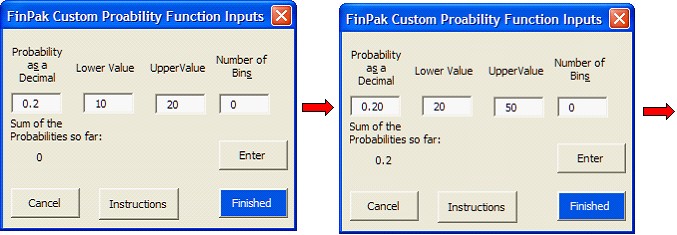
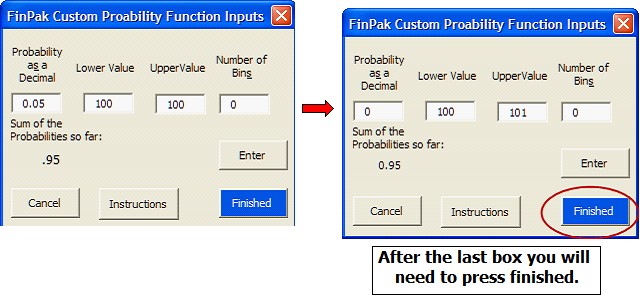
The first three values are required, the last is optional. Be sure to press the enter button after each entry. Then after the last value is entered then press the Finished button. At that point the wizard will create the inputs needed by the custom distribution function (fscustominv). Note that the box may display suggest values after the first entry. If these are not correct just change them.
After the wizard completes a new sheet will be contained in the workbook (Named: Distribution 1, 2, 3 etc). You can move the input box (the yellow box that starts in cell A2) that is on the sheet or you can use sheet by referring to the input box. If you that don't delete the sheet or the information will be lost. You can delete all of the content except the yellow box if you wish. (Since wizard will automatically create a new sheet to hold the inputs, it attempts to clean up if you cancel, so if you press cancel the wizard will attempt to delete the sheet.)
Example Distribution:
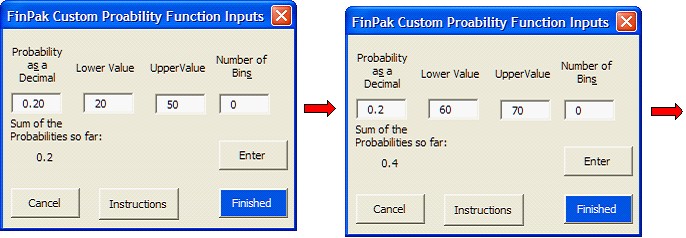
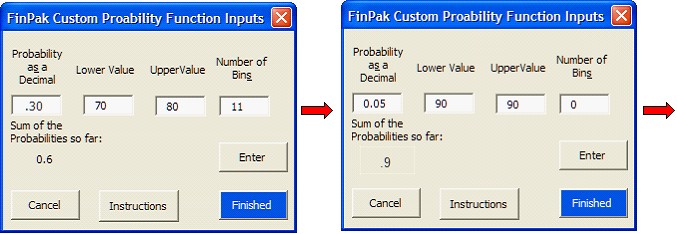
The input distribution can be anything you can dream up. Here is a distribution for a variable that we believe has a 20% chance of a value between 10 and 20; a 20% chance of a value between 20 and 50; a 20% chance of a value between 60 and 70; each of these are spread equally over the ranges. Notice that there is no chance of a value between 60 and 70. Also there is a 20% chance of a value between 70 and 80 spread equally over 11 values, so in this case the value can only take on whole numbers such as 70, 71, 72 . . . 80. Finally there is a 5% of a value of 90 and a 5% chance of a value of 100, nothing in-between.
The wizard will create the table along with the graph of the distribution on a new sheet:
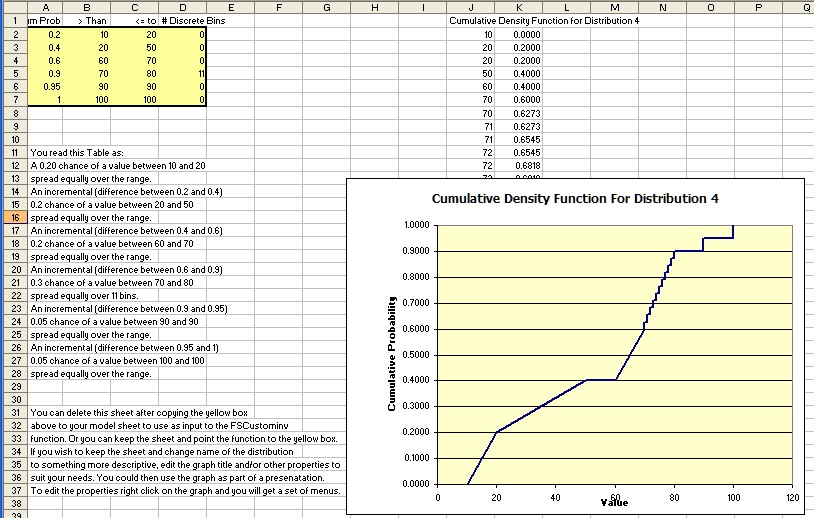
These result are used in the example custom distribution here.
Entering the probabilities:
There are various ways to enter the probabilities. One is the method shown above. The user enters them so that when all data is entered the probabilities add up to exactly one. Of course the probabilities over the range of all outcomes always adds to one.
After you push the finish button FinPak checks to see if the probabilities do in fact add up to one. If they don't PinPak adjusts the probabilities proportionally until they do. You can use this feature to entry probabilities in ways that maybe more convenient by entering relative values for the probabilities. Suppose you have 3 states of nature that each have a one-third chance. You can enter 1 for the probability each time. FinPak will then adjust the probabilities so each will have a 1/3 probability. If you had two events one with a 1/4 chance the other with a 3/4 chance you could use 1 for the probability of the first one and 3 for the probability of the second one. You mix whole numbers with decimal numbers. Thus with two events you could enter .5 for the first one and 2 for the second event. This would result in the first event being assigned a probability of .2 and second event being assigned a probability of .8. So any combination of numbers can be used and they can add to any amount.
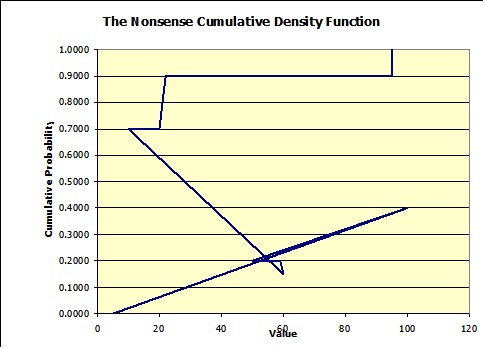
Error Checking:
The wizard will try to warn you if the distribution appears to be peculiar. As the example below indicates by the title this is a nonsense function. The wizard will not refuse to produce the table that describes this function, but it will warn you that it thinks the input is incorrect.
Copyright © 2009 Pieter Vandenberg